This is a very simple project using a printed circuit board and 8 components. It will flash an ordinary 3mm or 5mm (1/8" or 1/4") LED at a rate of about one flash per second.
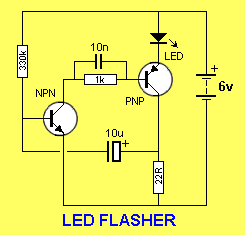
PARTS LIST
1 - 22R
1 - 1k
1 - 330k
1 - 10n
1 - 10u 16v electrolytic
1 - BC 547 - NPN
1 - BC 557 - PNP
1 - 1/4" (5mm) red LED
1 - LED FLASHER PC
A complete kit for this project is available from Talking Electronics. (or: Talking Electronics) The circuit has a couple of advantages over a flashing LED you can buy as an individual item. It pulses it with a higher peak current to give a brighter illumination and consumes less average current. This means it will work for a long time on an almost flat battery and cost nothing to run. It can be used for battery equipment to indicate the power is ON or as an ALARM ON indicator. You can use a super-bright LED and get a really bright flash, or an ordinary green, orange or yellow LED to get something better than a flashing red LED.
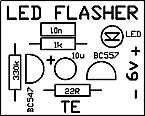
The LED Flasher PC board
THE CIRCUIT
This circuit works on the basis of a high-gain amplifier being driven into saturation (fully turned-on), firstly by the very small amount of current delivered by a high-value resistor and then from energy stored in an electrolytic.
When the energy from the electrolytic has been fully delivered, it cannot keep the amplifier fully turned on and it turns off slightly. This action removes the "turn-on" effect from the electrolytic and the amplifier begins to turn off. This action continues until the amplifier is fully turned off and is kept in the off state while the electrolytic begins to charge. The off-state is very long and the on-state is very short. This is how the LED produces a brief flash.
Here is the technical description of the operation of the circuit:
When the supply is connected, both transistors are off and the electrolytic charges via the 330k resistor and 22R. When the voltage on the base of Q1 rises to about .6v, the transistor begins to turn on and the resistance between its collector-emitter terminals is reduced. This allows current to flow in the collector-emitter circuit and Q2 is turned on via the 1k resistor. The 10n reduces the effect (the resistance) of the 1k resistor. Q2 conducts and the LED is illuminated. The current through the LED is limited by the 22R resistor and at this point in the cycle a voltage is developed across the 22R. The negative end of the electrolytic is `jacked up' by this voltage and the positive end pushes the charge on the electrolytic into the base of Q1 to turn it on even harder. In a very short time all the energy in the electrolytic has been delivered to Q1 and it cannot hold Q1 ON any longer. The transistor turns off slightly and this has the effect of turning off Q2 a small amount. The LED begins to turn off and the voltage across the 22R reduces. The negative lead of the electro drops a small amount and so does the positive lead. This action continues around the circuit until Q1 is fully turned off. This turns off Q2 and the LED is extinguished. The cycle starts again by the 10u charging. The charge-time is considerably longer than the discharge time and this gives the LED a very brief flash.
CONSTRUCTION
All the parts mount on a small PC board and it has an overlay (all our boards have overlays) as shown in the diagram below:
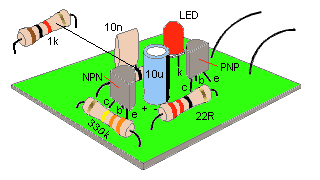
Mounting the components
This makes construction very easy and all you have to do is bend the leads of the components so they pass down the holes in the board. The resistor leads are bent to 90° and are pushed all the way down so they rest on the board. The leads are then bent slightly to hold them in place while the leads are soldered. Fit the three resistors in this way and you are ready for the two capacitors. The 10n can be fitted either way around but the 10u electrolytic must be fitted so the positive lead goes down the hole marked with a "+." The positive lead is the shorter of the two leads and the negative lead is marked on the side of the body of the component with a " —"
The two transistors are next and it is important not to mistake the PNP for the NPN. They both look identical. Check with the parts list for the types you have been given in the kit. Fit the leads down the holes so that the transistor is 2mm (1/8") from the board and bend the leads slightly so it does not fall out when the board is turned over and soldered. Finally the LED is fitted to the board.
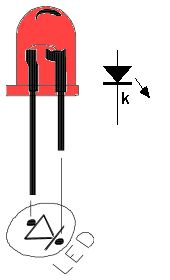
Fitting the LED
Refer to the diagram above for the identification of the cathode lead. Keep the LED above the board so it can be clearly seen. Solder a short length of red and black wire to the board and to 4 cells to complete the project. You can use almost any old cells for the 6v supply and let the LED FLASHER use them up completely.
No comments:
Post a Comment